github中的fork技巧
前言
进阶fork技巧,对初学者不是那么友好,建议拥有以下前置技能:
- 使用过github的fork/pr操作
- 熟悉使用git命令的多个分支,多个远端操作
- 熟练使用git处理合并分支冲突
各个大标题内容独立,可根据自己需求跳读:
- 如何将fork类型仓库转成自己的仓库
- 如何同步多个上游仓库
- 在fork之前clone上游仓库并commit了,怎么提pr
如何将fork类型仓库转成自己的仓库
有什么好处?
- 可以将其设置成私有仓库:fork类型的仓库无法设置成私有仓库
- 不打算提pr到上游仓库,并且想要有github的contributions(俗称:绿点/绿墙):fork类型的仓库,就算提交到了主分支,也不会有contributions.
使用github support的分离复刻。
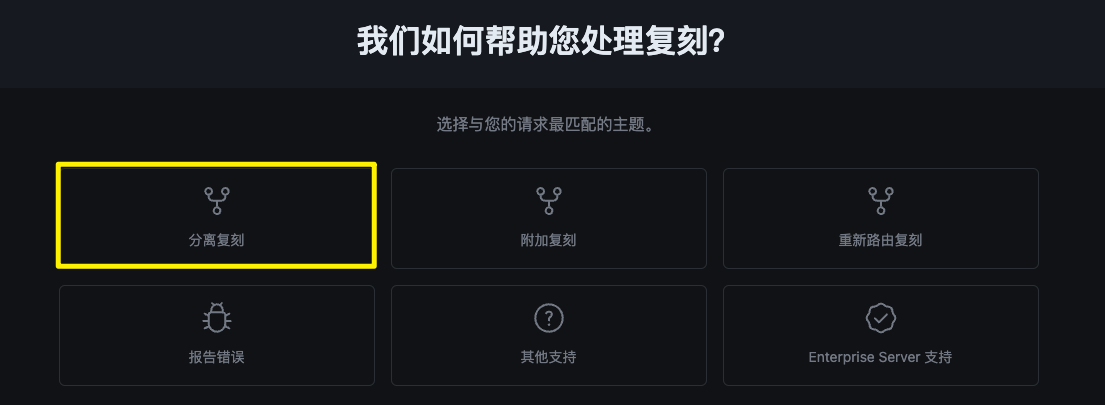
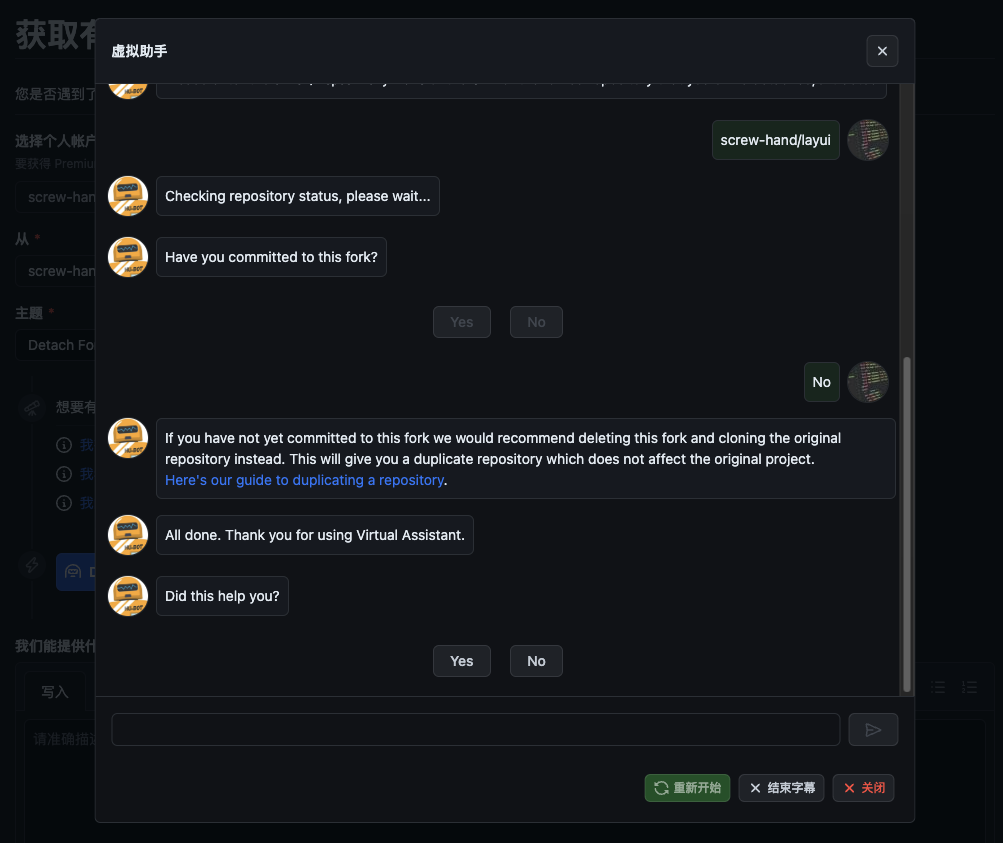
自动弹出这个对话框,执行以下操作:
- 选择Detach/Extract
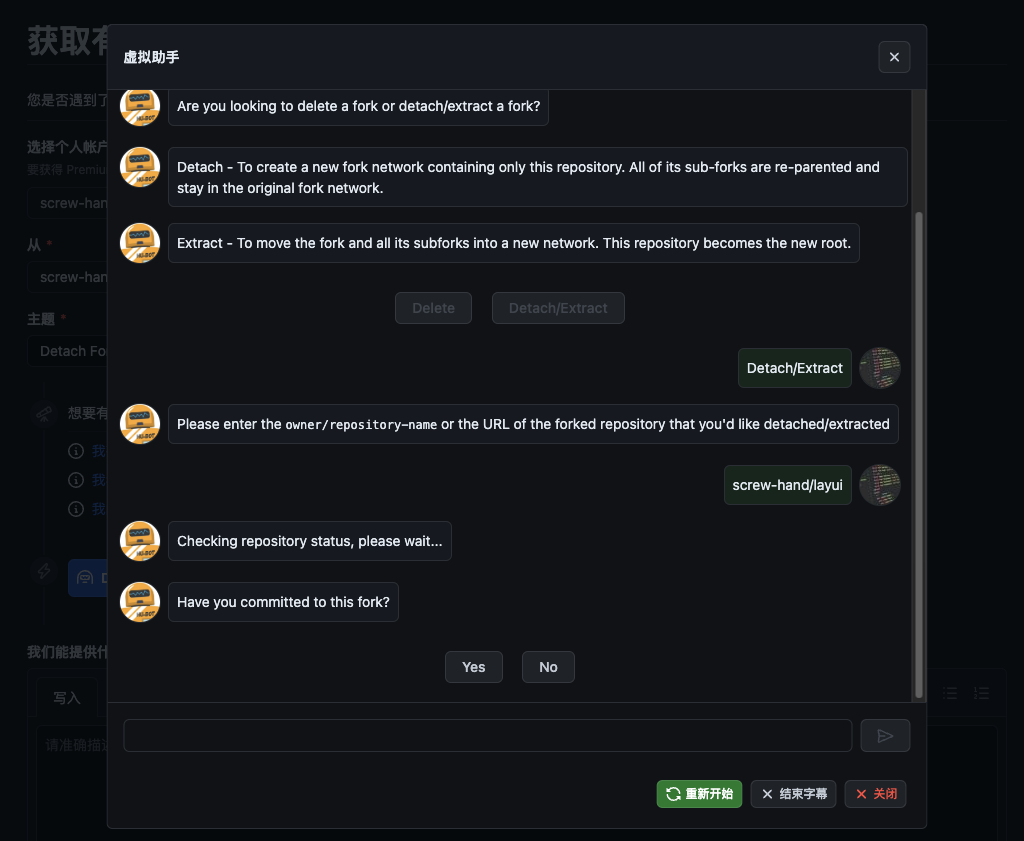
- 输入
owner/repository-name - 选择
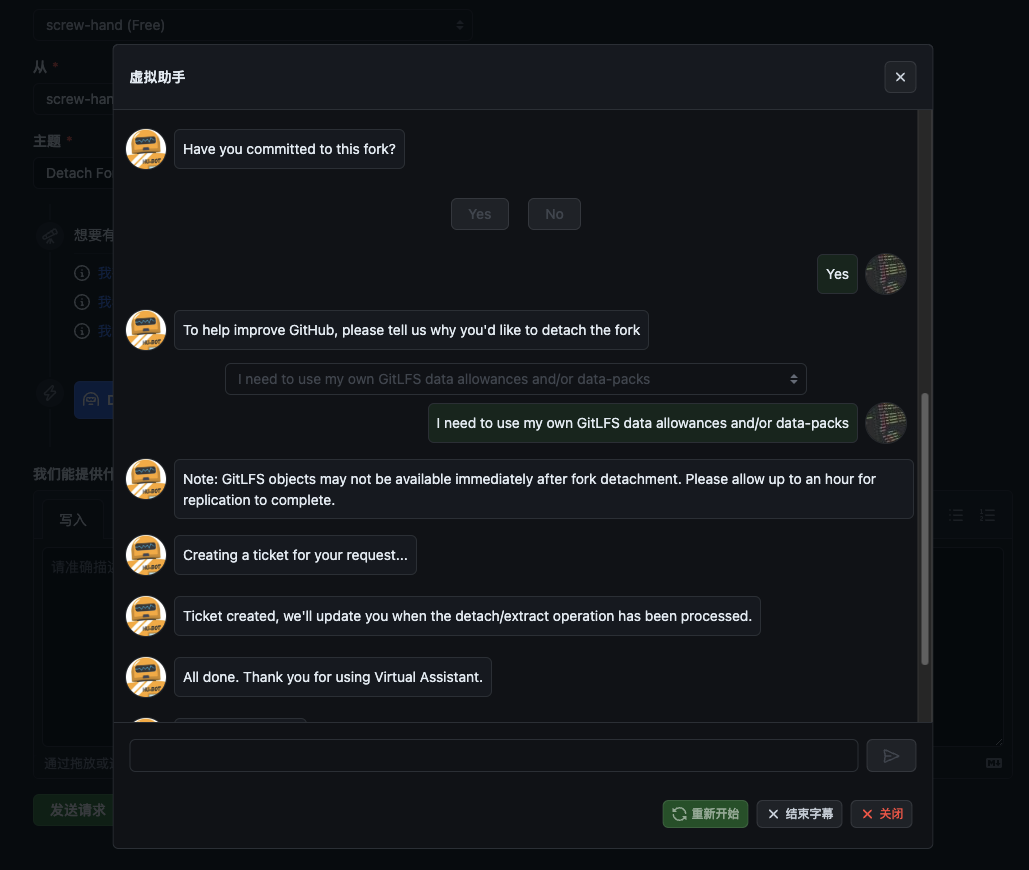
Yes(committed to this fork) 、选No会让你自己手动复刻一遍 - 选择
I need to use my own GitLFS data allowances and/or data-packs
等待邮件。
上图我选择了screw-hand/layui,作为例子。
其实之前我已经用过一次了,这是screw-hand/github-profile-trophy的邮箱通知:
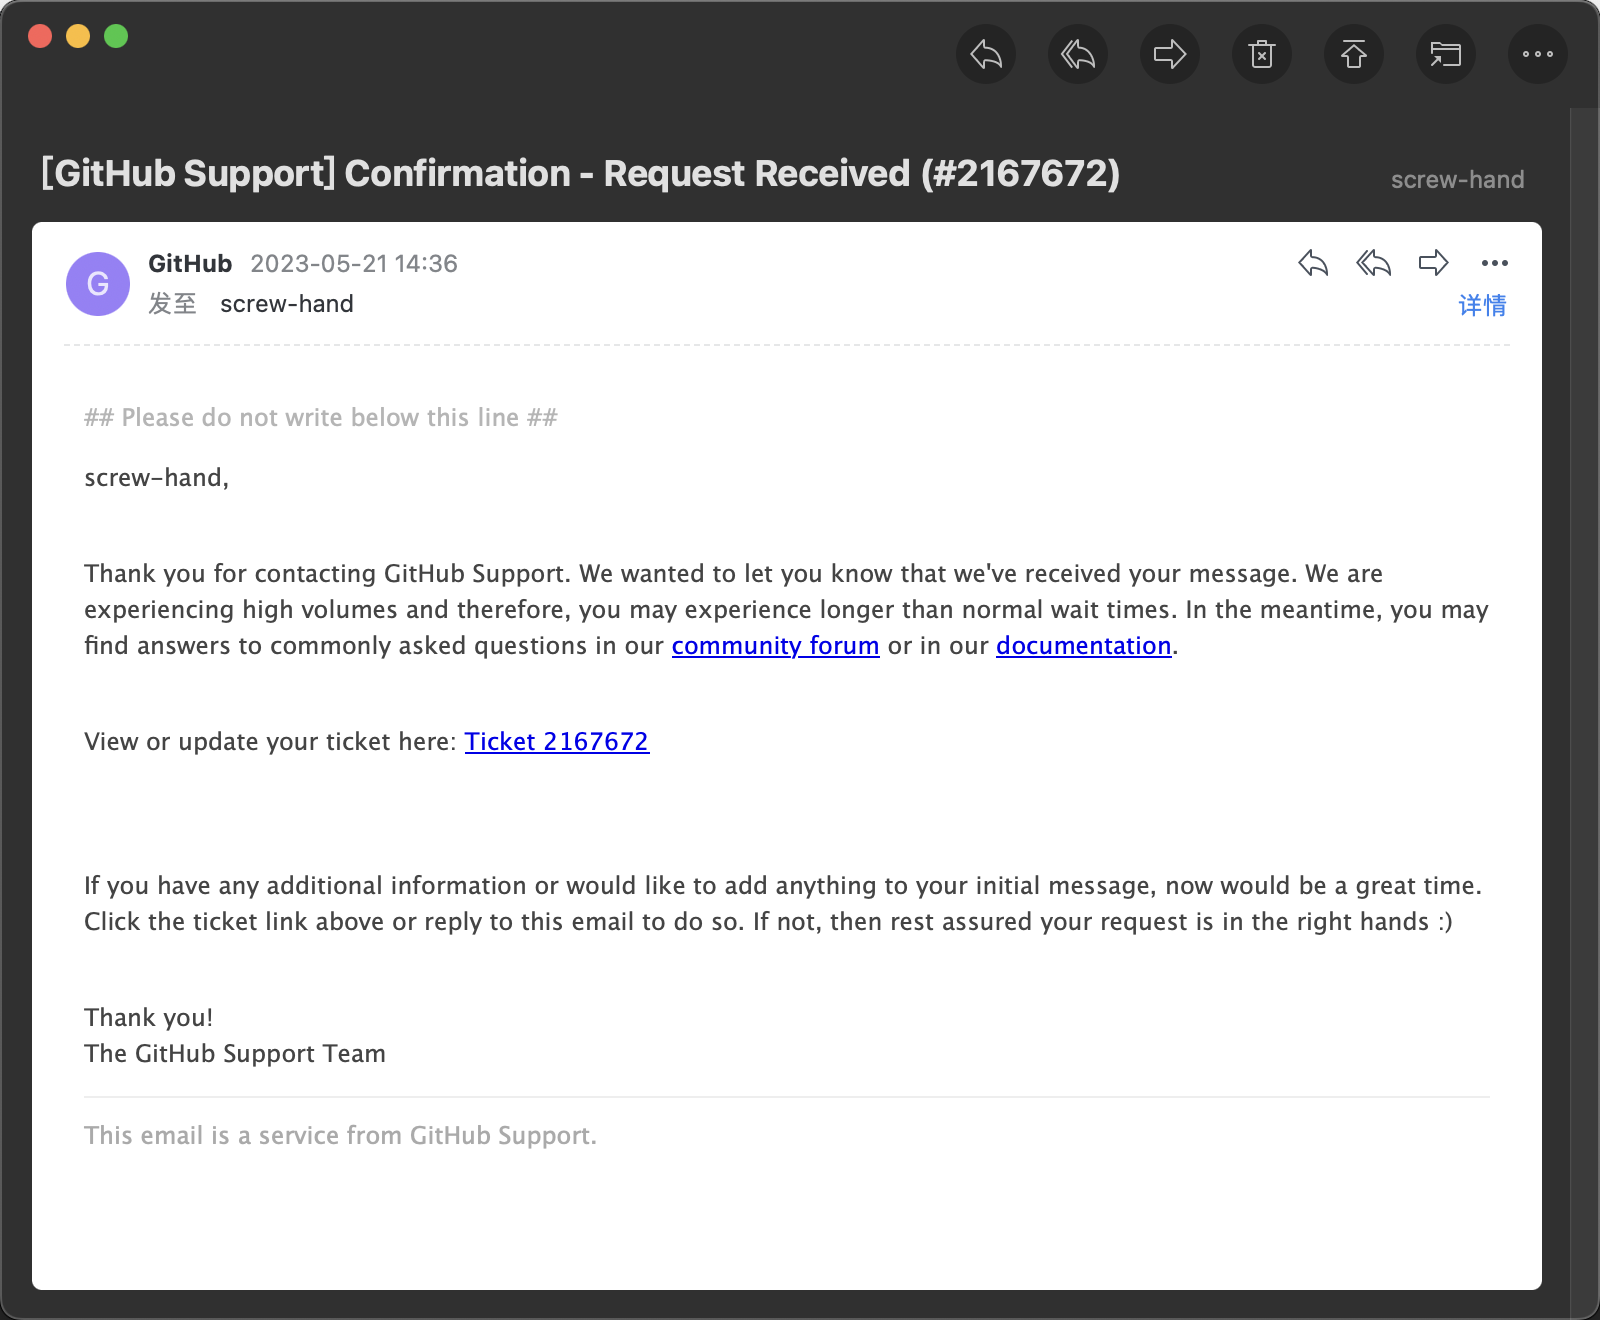
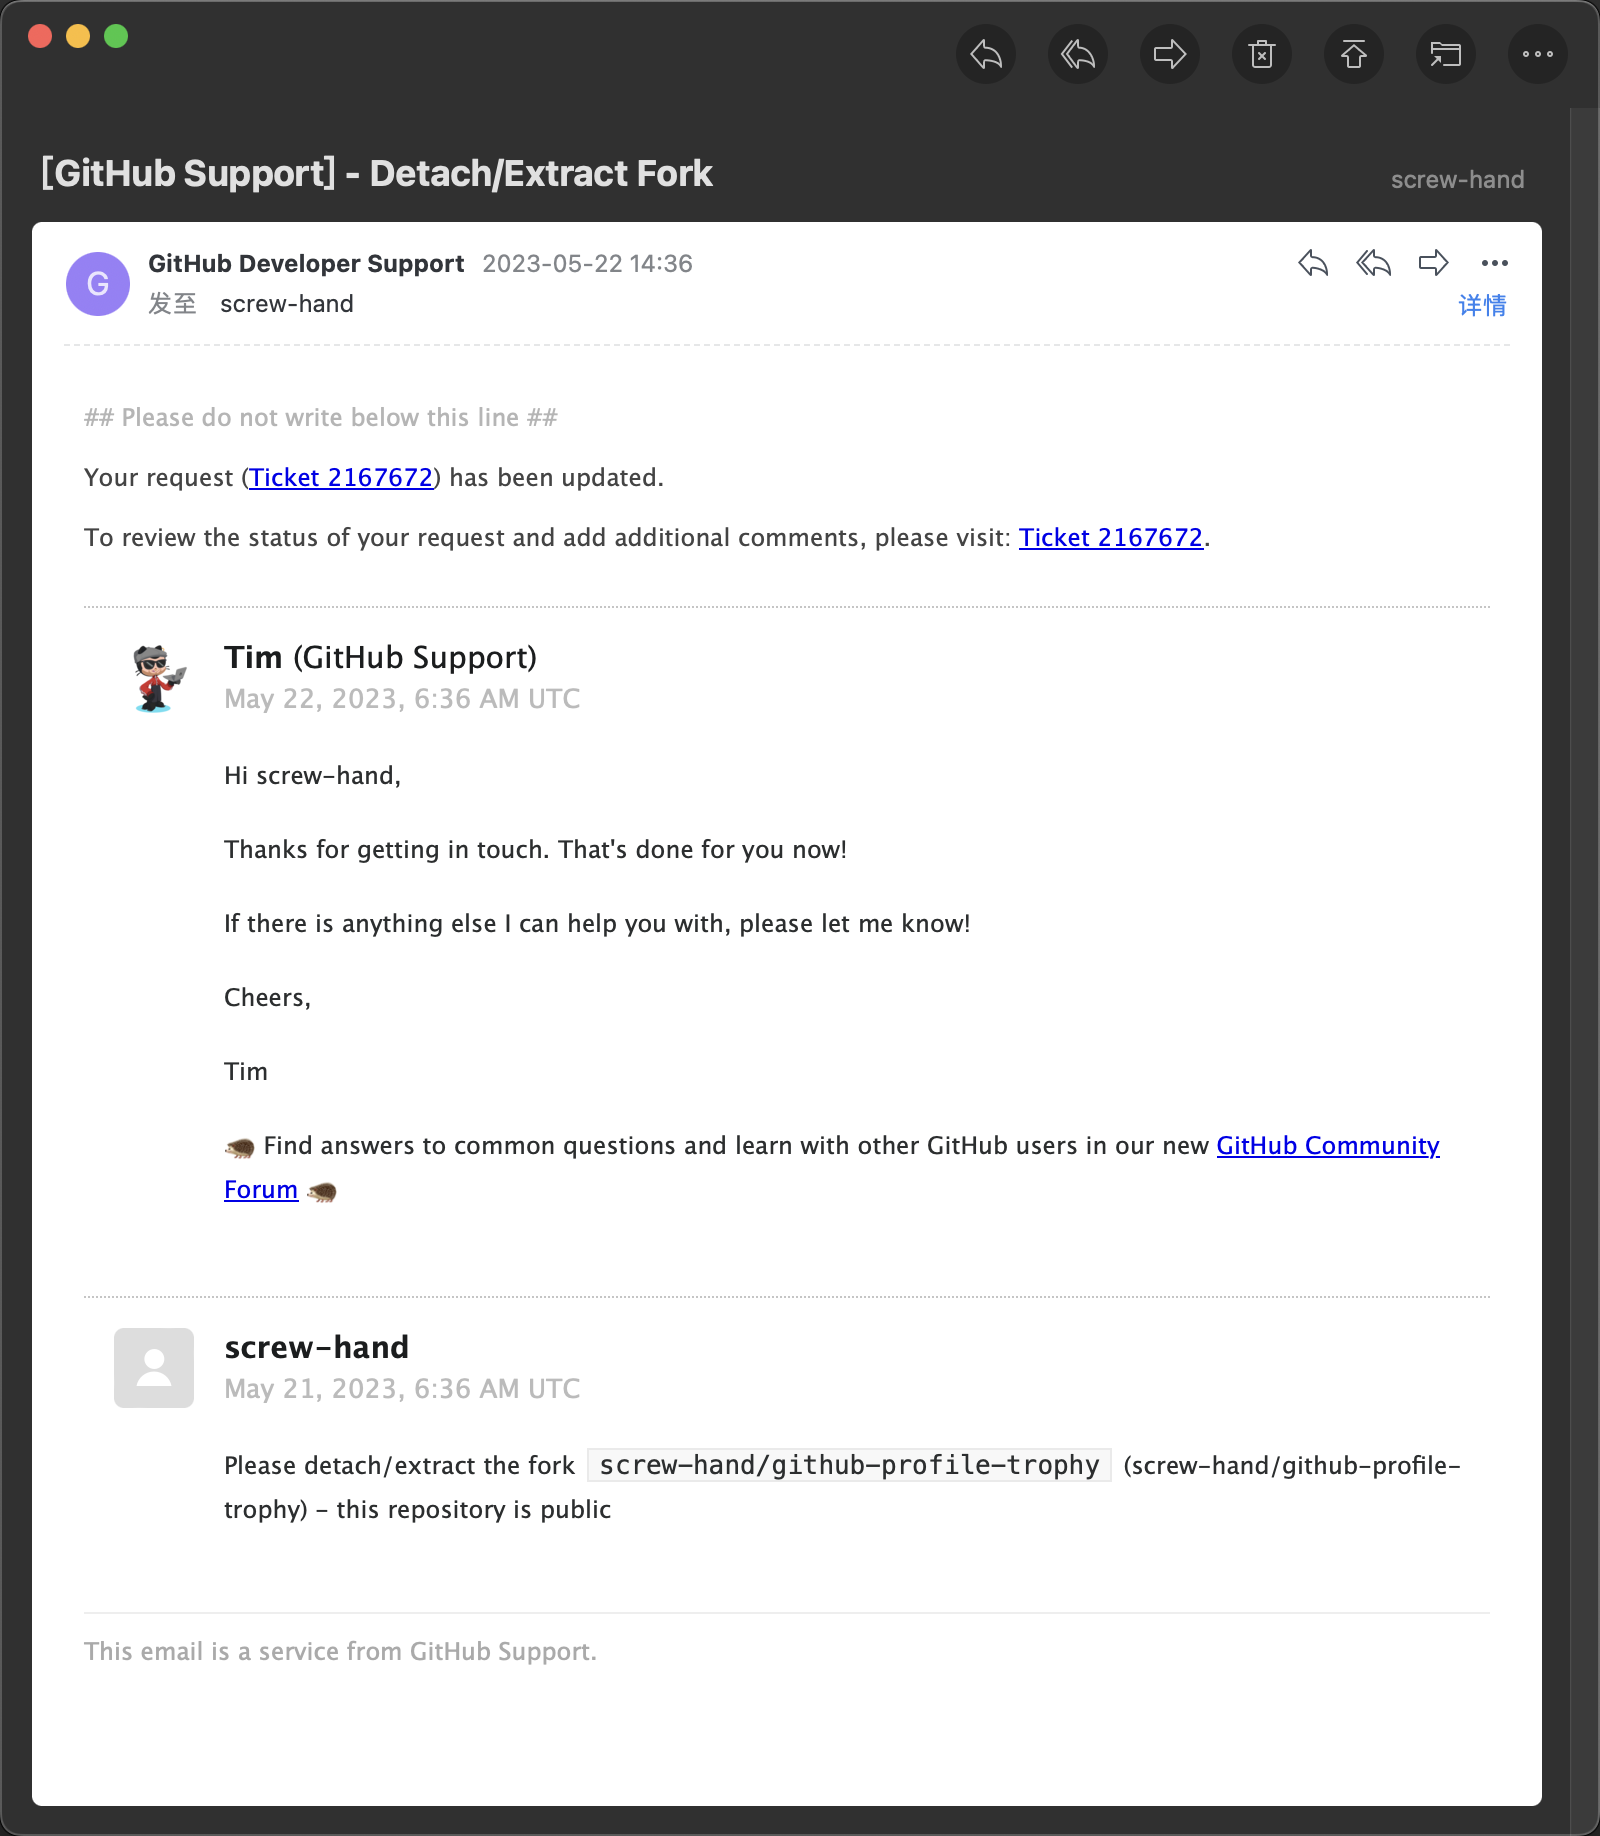
转成自己的仓库,github官方需要时间去处理, 可以参考一下两封邮箱的相差时间。
刚才选No的结果:
如何同步多个上游仓库
一个上游仓库
来,Syncing a fork - GitHub Docs, 这里有教我们fork后的repo,如何与上游的repo保持同步。
但是只教我们同步一个,如果我们自己的repo是一个N合1(缝合怪),需要跟多个上游仓库保持同步。就需要再执行一些操作了。
多个上游仓库
比如我的screw-hand/github-profile-trophy,就有两个上游:
https://github.com/ryo-ma/github-profile-trophy.git       # upstream
https://github.com/lucthienphong1120/github-trophies.git # super-upstream一个叫upstream,一个叫super-upstream,你喜欢叫其他的也行,就跟origin一样,这只是git的远端名称。
我的screw-hand/github-profile-trophy经过上文的github support操作,已经不是fork的仓库了。不过以下操作,跟是否为fork类型的仓库无关,你可以假设此仓库还是fork类型的。但是跟commit tree有关,待会我们会遇到的。
接下来的操作,你可以直接复制到你的命令行,随便拿我的screw-hand/github-profile-trophy去玩吧。
反正你push不了,哈哈。
本质上,同步多个上游仓库是用git命令行去添加多个remote,然后对remote branch进行合并的操作。
以下的命令是同步一个上游仓库,如果你对命令行多个远端操作比较熟悉,可以快速预览甚至跳过。
# 1. 我们已经有一个fork仓库,clone到本地
git clone https://github.com/screw-hand/github-profile-trophy.git
cd github-profile-trophy

# 2. 检查远端分支,现在只有一个orgin,指向你自己的仓库(fork仓库)
git remote -v

# origin	https://github.com/screw-hand/github-profile-trophy.git (fetch)
# origin	https://github.com/screw-hand/github-profile-trophy.git (push)

# 3. 回到当前分支的第一个commit
# 注:为了示例,让下面第7步有输出,特意回退了提交
#    实际情况不需要回退,但如果上游仓库没新提交
#    将是:`Already up to date.`
git reset $(git rev-list --max-parents=0 HEAD) --hard

# HEAD is now at 5a9cbef first commit

# 4. 添加多个远端仓库,分别为: upstream, super-upstream
git remote add upstream https://github.com/ryo-ma/github-profile-trophy.git
git remote add super-upstream https://github.com/lucthienphong1120/github-trophies.git

# 5. 检查远端仓库是否成功设置,将有3个远端仓库
git remote -v

# origin	https://github.com/screw-hand/github-profile-trophy.git (fetch)
# origin	https://github.com/screw-hand/github-profile-trophy.git (push)
# super-upstream  https://github.com/lucthienphong1120/github-trophies.git (fetch)
# super-upstream  https://github.com/lucthienphong1120/github-trophies.git (push)
# upstream        https://github.com/ryo-ma/github-profile-trophy.git (fetch)
# upstream        https://github.com/ryo-ma/github-profile-trophy.git (push)

# 6. 更新远端仓库的所有信息(分支、标签)
git fetch --all

# Fetching origin
# Fetching upstream
# From https://github.com/ryo-ma/github-profile-trophy
#  * [new branch]      VegaDeftwing-master        -> upstream/VegaDeftwing-master
#  * [new branch]      juicyfresh                 -> upstream/juicyfresh
#  * [new branch]      master                     -> upstream/master
#  * [new branch]      pr-125                     -> upstream/pr-125
#  * [new branch]      radical                    -> upstream/radical
#  * [new branch]      spenserblack-theme/dracula -> upstream/spenserblack-theme/dracula
# Fetching super-upstream
# From https://github.com/lucthienphong1120/github-trophies
#  * [new branch]      main       -> super-upstream/main

# 7. 执行远端合并, `git fech --all`,你可以看到remote upstream的默认分支是master
# 如果不知道怎么找默认分支,去github repo web找:https://github.com/ryo-ma/github-profile-trophy
# github repo web当前的分支就是默认分支
git merge upstream/master

# 省略输出,此刻成功合并`upstream/master`的所有内容,无冲突到这里为止,其实我们的操作跟Syncing a fork branch from the command line是完全一样的。但我们合并第二个远端分支,问题就来了。
多个上游仓库的特殊处理
# 执行第二个远端分支合并,`git merge super-upstream/main`会成功吗?
git merge super-upstream/main
# fatal: refusing to merge unrelated histories
# why ??因为git觉得super-upstream/main跟我们现在的origin/master的分支毫无相干,你可以理解为没有一致的“commit tree”。
但是我们为什么可以执行git merge upstream/master呢?因为origin就是fork了upsteam的remote而来的。所以我们刚直接merge是有一定概率毫无冲突的。
通过stackoverflow的帮助,我们继续执行。
git pull super-upstream main --allow-unrelated-histories
# From https://github.com/lucthienphong1120/github-trophies
#  * branch            main       -> FETCH_HEAD
# hint: You have divergent branches and need to specify how to reconcile them.
# hint: You can do so by running one of the following commands sometime before
# hint: your next pull:
# hint:
# hint:   git config pull.rebase false  # merge
# hint:   git config pull.rebase true   # rebase
# hint:   git config pull.ff only       # fast-forward only
# hint:
# hint: You can replace "git config" with "git config --global" to set a default
# hint: preference for all repositories. You can also pass --rebase, --no-rebase,
# hint: or --ff-only on the command line to override the configured default per
# hint: invocation.
# fatal: Need to specify how to reconcile divergent branches.

# 出现这个是因为没有配置git如何处理冲突,建议使用`merge`,不建议配置成全局
git config pull.rebase false

# 再次执行`git pull super-upstream main --allow-unrelated-histories`
# 现在是
# From https://github.com/lucthienphong1120/github-trophies
#  * branch            main       -> FETCH_HEAD
# Auto-merging LICENSE
# CONFLICT (add/add): Merge conflict in LICENSE
# Auto-merging README.md
# CONFLICT (add/add): Merge conflict in README.md
# Auto-merging index.ts
# CONFLICT (add/add): Merge conflict in index.ts
# Auto-merging src/card.ts
# CONFLICT (add/add): Merge conflict in src/card.ts
# Auto-merging src/github_api_client.ts
# CONFLICT (add/add): Merge conflict in src/github_api_client.ts
# Auto-merging src/theme.ts
# CONFLICT (add/add): Merge conflict in src/theme.ts
# Auto-merging src/trophy.ts
# CONFLICT (add/add): Merge conflict in src/trophy.ts
# Auto-merging src/trophy_list.ts
# CONFLICT (add/add): Merge conflict in src/trophy_list.ts
# Auto-merging src/user_info.ts
# CONFLICT (add/add): Merge conflict in src/user_info.ts
# Auto-merging src/utils.ts
# CONFLICT (add/add): Merge conflict in src/utils.ts
# Automatic merge failed; fix conflicts and then commit the result.
好了,现在已经是合并中的状态了,剩下的就是处理文件冲突了。就像我们平时一样:
- 查看文件改动历史,比较差异
- 根据自己需要,调整文件
- 测试代码
git add .git commit -m XXXgit push
为了节约时间,我不处理文件冲突,直接提交到origin/fork-example。
因为这是个示范,这些事情我之前做过了,任何时候都不建议将未处理的冲突文件提交!!
git add .
git commit -m "chore: new branch of fork-exapmle"
git checkout -b fork-exapmle
git push --set-upstream origin fork-exapmle跟踪多个上游仓库的更新
至此第一次同步多个上游仓库就结束了。后续如果想继续跟踪远端上游的变动并且合并,也是大概这样的思路。
# 1. 获取远端信息,如果有新的变动,此次终端会输出信息
git fetch --all
# 2. 合并fork的上游,此时大概率需要解决冲突
git merget upstream
# 3. 合并非fork的上游,仍然需要注意冲突
git pull super-upstream main --allow-unrelated-histories
记录上游仓库信息
建议把remote的信息记录在repo的REAME.md!! README.md - Init Project
因为现在的仓库已经不是fork类型的,跟上游完全切断了联系,如果不记录的话。
后续更换开发设备,或者意外删除本地的git仓库,将会完全失去与上游的联系!
实例,为什么要同步多个上游仓库
为什么我的github-profile-trophy需要同步两个上游仓库呢?
- upsteam 两年内一直在更新
- super-upsteam 有upsteam没有的新功能,但是两年没更新了
- 我也需要对其做一些定制化开发
所以将两个上游仓库一起跟踪合并是最好的。
如果对这个github-profile-trophy感兴趣,你也可以将下面的两个链接添加到你的github profile page,别忘了将screw-hand换成自己的github username。
# 过滤掉指定等级(UNKNOWN,C)的奖杯
https://github-profile-trophy.screw-hand.vercel.app/?username=screw-hand&rank=-UNKNOWN,-C

# 只展示所有秘密奖杯,并且全部无条件获得
https://github-profile-trophy.screw-hand.vercel.app/?username=screw-hand&rank=SECRET&wantAll=true
在fork之前clone上游仓库并commit了,怎么提pr
可能大多数人都是有了pr的想法,就第一时间fork仓库。我更喜欢clone上游仓库到本地。
为什么要先clone上游仓库到本地呢?有时候我们只是想随意看看其他人的代码,跑一跑。
然后发现一些地方可以新增功能,修复bug,我们本来没有提pr的意思,现在代码也改了。
也不想再去fork之后,再cc cv代码到新的fork repo。
当然github也可以在线浏览代码,clone到本地的话,除了看代码,也可以直接把项目先跑起来,改着玩玩。
这时候也可以直接修改代码然后commit,只是因为远端的仓库我们没有权限无法push。
还有一种情况是: 如果一开始就是冲着提pr,先fork了,改不动代码了,这时候除了删本地的文件夹,还需要在删掉github的fork仓库。
比如我们想给haozi/New-Bing-Anywhere提一个pr。
# 1. clone上游仓库到本地
git clone https://github.com/haozi/New-Bing-Anywhere.git
cd New-Bing-Anywhere

# 2. 浏览代码 / 启动项目 / 更改代码 / commit
touch pr-file
git add .
git commit -m "feat: pr-file"

# 3. 直接push
git push
# 因为没有仓库的权限,无法直接push到haozi/New-Bing-Anywhere
# fatal: Authentication failed for 'https://github.com/haozi/New-Bing-Anywhere.git/'这个时候,我们再来fork也不迟,所以我们先到github执行fork操作,得到screw-hand/New-Bing-Anywhere
# 1. 查看远端
git remote -v
# origin	https://github.com/haozi/New-Bing-Anywhere.git (fetch)
# origin	https://github.com/haozi/New-Bing-Anywhere.git (push)

# 2. 将origin换成upstream
git remote rename origin upstream

# 3. 添加fork后的remote为origin
git remote add origin https://github.com/screw-hand/New-Bing-Anywhere.git

# 4.检查远端
git remote -v
# origin	https://github.com/screw-hand/New-Bing-Anywhere.git (fetch)
# origin	https://github.com/screw-hand/New-Bing-Anywhere.git (push)
# upstream	https://github.com/haozi/New-Bing-Anywhere.git (fetch)
# upstream	https://github.com/haozi/New-Bing-Anywhere.git (push)

# 5. 获取远端分支
git fetch --all
接下来pr的常规流程:
- 切分支
- commit
- push
- pr
# 1. 检出新分支
git checkout -b pr-example

# 2. 推送到指定分支
git push --set-upstream origin pr-example

# 3. 删除之前commit的main分支
git branch -D main

# 4. 恢复main分支到未commit的状态
git checkout -b main origin/main
这一顿操作下来,会比第一时间fork更麻烦,可以当做没fork之后的补救措施吧。
clone上游仓库后,创建自己的repo
这是一种比
如何将fork类型仓库转成自己的仓库、#fork之前clone上游仓库并commit了,怎么提pr更简单的操作方式,效果是一样的。
先clone想要的上游仓库。
我觉得用GitHub CLI速度更快更方便,以下实例我用会GitHub CLI,跟在github web上操作是等效的。
以下origin的github username,你需要换成自己的。
- 设计我们的远端仓库
https://github.com/snyk-snippets/modern-npm-package.git # upsteam
https://github.com/screw-hand/modern-npm-package.git # origin- clone上游仓库
git clone https://github.com/snyk-snippets/modern-npm-package.git*此刻你或许会在这里提交代码,但是你无法推送到别人的远端(snyk-snippets/modern-npm-package)
更名远端仓库origin(snyk-snippets/modern-npm-package)为upsteam(snyk-snippets/modern-npm-package)
git remote -v
# origin https://github.com/snyk-snippets/modern-npm-package.git (fetch)
# origin https://github.com/snyk-snippets/modern-npm-package.git (push)

git remote rename origin upsteam

git remote -v
# upsteam	https://github.com/snyk-snippets/modern-npm-package.git (fetch)
# upsteam https://github.com/snyk-snippets/modern-npm-package.git (push)- 使用GitHub CLI创建一个新repo
gh repo new

? What would you like to do? Push an existing local repository to GitHub
? Path to local repository .
? Repository name modern-npm-package
? Description fork from [snyk-snippets/modern-npm-package](https://github.com/snyk-snippets/modern-npm-package)
? Visibility Public
✓ Created repository screw-hand/modern-npm-package on GitHub
? Add a remote? Yes
? What should the new remote be called? origin
✓ Added remote git@github.com:screw-hand/modern-npm-package.git
? Would you like to push commits from the current branch to "origin"? Yes
Enumerating objects: 77, done.
Counting objects: 100% (77/77), done.
Delta compression using up to 8 threads
Compressing objects: 100% (40/40), done.
Writing objects: 100% (77/77), 117.86 KiB | 458.00 KiB/s, done.
Total 77 (delta 33), reused 67 (delta 27), pack-reused 0
remote: Resolving deltas: 100% (33/33), done.
To github.com:screw-hand/modern-npm-package.git
 * [new branch]      HEAD -> main
branch 'main' set up to track 'origin/main'.
✓ Pushed commits to git@github.com:screw-hand/modern-npm-package.git操作很简单,第一次选项选择Push an existing local repository to GitHub,一路回车即可。Description看你,复制upsteam的也行,我这里自己写了。
其他选项是关于仓库的可见性、是否添加远端、添加远端后是否要push。
跟在github web的操作其实是一样的,只是GitHub CLI的引导选项很方便。
- 再次检查远端仓库
git remote -v
origin	git@github.com:screw-hand/modern-npm-package.git (fetch)
origin	git@github.com:screw-hand/modern-npm-package.git (push)
upsteam	https://github.com/snyk-snippets/modern-npm-package.git (fetch)
upsteam https://github.com/snyk-snippets/modern-npm-package.git (push)- 查看github web
https://github.com/screw-hand/modern-npm-package
结尾
为什么有时候提交了没contributions/绿点/绿墙: Why are my contributions not showing up on my profile? - GitHub Docs
…